Showing posts with label buttercream. Show all posts

Teenage Mutant Ninja Turtle Cake (birthday)


My blog started out of my love for making birthday cakes for my loved ones. I still 10 years on still love making a birthday cake most of all!

Recently my girls have started watching Teenage Mutant Ninja Turtles and words cannot express how happy that makes me. I have been a fan of the Turtles since I can remember! When we moved house, back when I was 6, my dad made my sisters and I a turtle lair out of one of our moving boxes and we played in it until it fell apart! Or until that time our basement flooded.... that flood ruined all our original Batman movie trading cards. Stupid flood. 

Anyway, my littlest one is now 6 years old and she asked for a chocolate turtle cake, I was happy to oblige! 

I have tried baking and tasted many chocolate cakes and most of them are dry and only mildly taste of chocolate. But I found one that works every time and it's super chocolatey!


Ninja Turtle Birthday Cake: 

chocolate cake
110g dark chocolate, broken up 
240ml boiling water, boil then measure
225g granulated sugar
195g plain flour
1/2 tsp salt 
3/4 tsp bicarbonate of soda
225g light brown sugar
120ml sunflower oil
110g sour cream
2 eggs
1 tsp vanilla extract 

Heat the oven to 180C; line and grease two 8 inch or 9 inch cake pans - if using 8 inch there will be a little batter left over perfect for cupcakes or mini cake. 
Put the broken up chocolate in a large bowl and pour the boiling water over it, leave to the side and mix the sugar, flour, salt, and bicarb of soda in a separate bowl. Leave that to the side for a moment and go back to the chocolate/water. Whisk them together until smooth, then add the brown sugar, oil, sour cream, eggs, and vanilla one at a time whisking until smooth after each addition. Add a third of the flour mixture to the chocolate mixture and whisk until smooth repeating two more times until all the dry mixture is incorporated into the wet mixture. Pour into the prepared pans about 3/4 full and bake for 30-35 minutes. Do not over fill the cake tins as they will not bake properly and over flow, I know this from personal experience. 
Leave to cool in the tins for at least 5 minutes and leave to cool completely before icing and decorating.

buttercream
250g icing sugar
80g unsalted butter, room temperature 
25ml milk
1/4 tsp vanilla extract

Beat the butter until soft and fluffy - add the icing sugar, milk, and vanilla. Beat until it's smooth and creamy. Add icing sugar if it's too soft and milk if it's too stiff. 

constructing the cake - once the cake is cooled spread the bottom layer with buttercream and place the other on top and cover that with butter cream as well. Leave a little bit of butter cream to use as a "glue" for the fondant mask/eyes/mouth. 


turtle decor
green fondant, enough to cover a 2 layer cake
white fondant, enough to make eyes/teeth
red/blue/orange/purple fondant, enough to make face mask
*I use store bought fondant. 

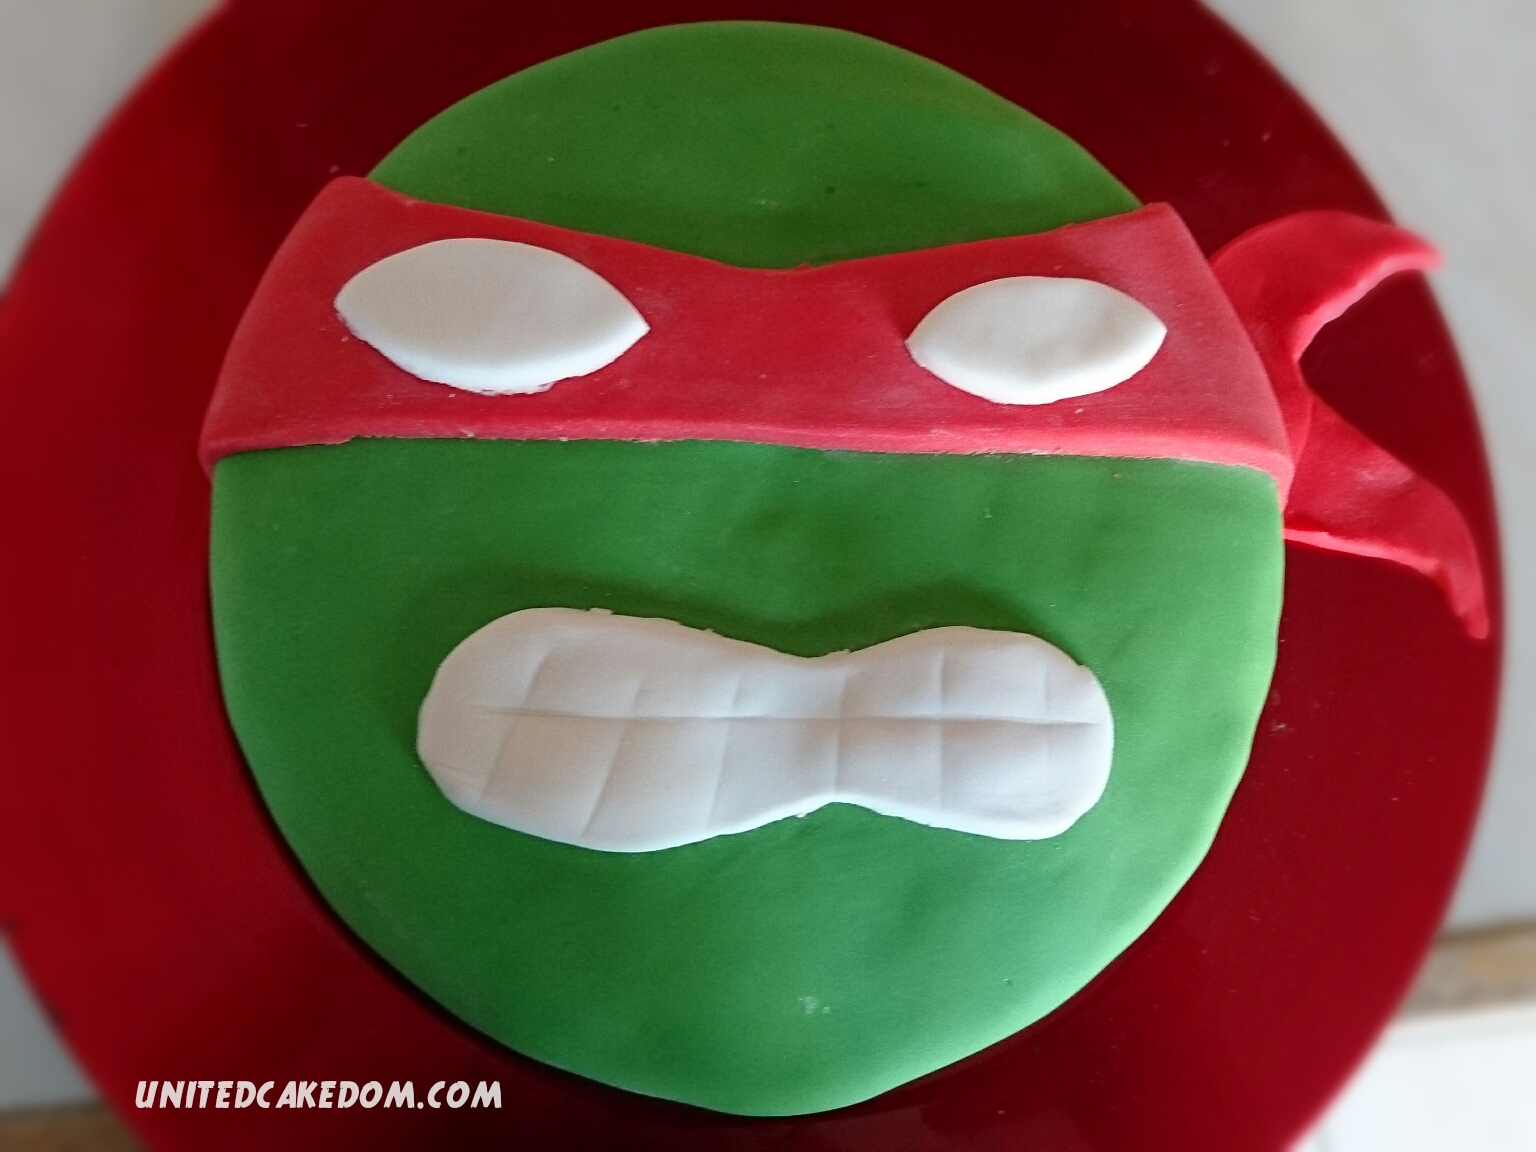
Dust your work surface with icing sugar to keep the fondant from sticking, roll it out as thin/thick as you like, but enough to cover the cake. I roll it out pretty thin as we aren't fondant lovers in this house. Gently wrap the fondant over the rolling pin to lift it up and lay across the cake. Gently smooth over the cake and press down around the edges. 
Then re-dust with icing sugar and roll out the color fondant for the mask. I free handed it, but if you want go online and print out a turtle mask and use it to trace. 
Again re-dust and roll out the white for the eyes and mouth. For the eyes I used circle cutters and the mouth I free handed. Like above go online and print a turtle mouth out if you want it to be exact. 


notes: recipe adapted from bake! by Nick Malgieri and hummingbird bakery cookbook by Tarek Malouf and the hummingbird bakers

Surprise Cake! {birthday cake}

I am a bad mom.

It’s not entirely true, but mom guilt is real people.

See I don’t do birthday parties. My girls don’t seem too bothered by this as we’ve never really done birthday parties, but I still feel guilty about it.

We still celebrate with family and a few friends! She did request a special cake and insisted on pizza for dinner! She also had lots of presents of clothes and design/coloring books.

No party, though. Maybe one year we'll throw her a big party and until then I will continue to feel slightly guilty about it. Only slightly though because the part of me that doesn’t feel guilty feels relief that I don’t have the stress and cost of a party.

This year, my now 8 year old, wanted a surprise cake - one that had sweeties in the middle.


How I made the cake: I used a tried and tested vanilla cake, from Rachel Allen’s Cake book. Which didn't rise as much as it usually does, but it tasted fine so I worked with it.

I used my circle pastry cutters to put a hole in the middle of the top layer of the cake. Set aside the circle of cut out cake. With a thin layer of buttercream, lay it on top of the bottom layer. Pour a bag of sweets in the hole. Cut the saved bit of circle cake in half and squish it back in the hole. Use a little bit of buttercream to stick it back to the sides if necessary. Then frost it with the remaining buttercream and cover it with sprinkles of your choice!


Coconut Roll Biscuits or Kókusztekercs három színben


Since 1956 Eurovision has been a source of entertainment to all of Europe and apparently Australia? As an American ExPat I never really got into Eurovision, in fact if it hadn't been the theme for Treat Petite (blogger challenge) this month it probably would have passed me by again this year.

I thought it was a great theme for the challenge and it had me researching a couple of the countries I find interesting. The research now has me following an amazing Icelandic food blog, which is completely unrelated to the rest of this post! In the end I went with the best sort source one could find, I asked someone.

More specifically I asked my neighbor and friend Niki who happens to be Hungarian. Last Friday she came over and helped me make these super fun no bake Coconut Rolls. The base is made from digestive biscuits, sugar, cocoa powder, butter, almond extract, and apricot jam.


This combination is also used to make a truffle like treat. Instead of rolling out the dough, like you do in the instructions, they are rolled into balls before being coated in coconut. Also rum is used in place of the extract. Sometimes it’s even wrapped around a cherry to make it even more special.

However these rolls are the most popular with children and I can see why. The fun colors of the buttercream filling are very eye catching! You can use whatever colors you want really. These are pretty versatile treat!

Niki has made these so many times she was just pouring things in and adding a little more of this or that. I did take notes so here is how we made these delicious coconut rolls. Trust me when I say you won’t be able to resist them.


Coconut Rolls:

900g digestive biscuits
250g golden caster sugar
60g cocoa powder
1 bag desiccated coconut
250g unsalted butter, very soft
1-2 teaspoons almond extract to taste
½ jar of apricot jam
milk, as needed
buttercream (recipe follows)

Blitz all of the digestive biscuits in a food processor until they are tiny crumbs. Mix in the sugar, cocoa powder, and about ½ of the bag of coconut. Add the butter, extract, and jam – mix using your hands until you get a soft sticky like dough. Add either more jam or milk if it’s too dry. It is easier to add more jam or milk if the mixture is dry then to add more biscuit crumbs if the mixture is too wet, so be careful.

Once the mixture is completely combined it will be a bit sticky, but you should be able to handle. Divide it into 3 portions as evenly as possible. Take 1/3 of the dough and place it on a big sheet of cling film – enough to fold over the mixture and gently roll it out to a rectangle shape approximately 20x31cm or 8 ½ x12 inches. Spread one color/portion of the buttercream over the dough leaving a small boarder around the edges.

On one of the shorter ends gently start to the dough up by tucking the edge in. Keep it as tight as possible using the cling film to help it along. Once rolled leave to the side and repeat two more times with the remaining dough and other colors of buttercream. Then sprinkle the rest of the coconut out on the work surface and very gently roll each roll in the coconut. You may have to help it stick in places by gently pressing down.

Leave in the fridge for at least an hour before slicing. I was told I cut mine a little too thick, but not sure it matters much, as they won’t last long.

butter cream:

250g unsalted butter, soft
250g golden caster sugar
1 tsp vanilla extract 
3 different food color pastes

Beat the butter, sugar, and vanilla together until combined and soft. Divide as evenly as possible into 3 separate bowls making each one a different color. Follow instructions above.

Thank you Niki for spending the afternoon with me and sharing this treat from your home country! And good luck to Hungary in the Eurovision finals! 


notes: this is my entry for the Treat Petite Blogger Challenge hosted by Cakeyboi and The Baking Explorer there is still time to get your entry in! 


Chocolate Birthday Cake {butterfly}

A little something for the weekend!! I just wanted to share some pictures of my daughter's birthday cake from last weekend.

She turned five. Five is a big deal! It means she's officially left the toddler stage, even if she can still throw a great tantrum and has entered the world of being a proper little girl.

There are a few things I miss about her being little, but I love watching her become herself more! It's the best part of being a parent seeing them grow up and watching them discover who they are even though you already know! 

I was instructed that it had to be a chocolate cake and turquoise and have a butterfly. I think it was a bit more green than blue to be turquoise, but other than that I think I did alright! 


Chocolate Bailey's Nanaimo Bars


You know how one day you’re just living life and then something happens that changes your life forever? And it makes you wonder how you ever lived before?

That’s exactly how I felt after I tried my first Naniamo bar. How did I live before these bars came into my life? They are the best no-bake bars I have ever had.

If you don’t know what a Naniamo Bar is, it’s a bar that has a nutty, coconut, biscuit base topped with a creamy custard like filling and a layer of chocolate. They are named after a town in Canada. There is some debate about where they originated, but does it really matter after the first bite. All that matters is where and when you will get more!

When I went in search for a recipe most of the ones I found were in American cup measurements. It’s not a problem, but since I've been baking in the UK for some long I have just gotten used to using scales. For these no-bake bars cups just make sense as there is a lot of throw this or that together! 

OXO now have a 7 Piece Measuring Cup set available which is exciting to me because it includes a 1 and a ½ cup as well as a ¾ cup! They also have a matching 7 Piece Measuring Spoon set of measuring spoons. If you would like a chance to win a set of each including a Baking Spatula and a magic Baker’s Dusting Wand please follow the instructions in the widget below!

The best part of these bars is that the creamy custard middle can be adjusted in many ways. In this one I have added some Chocolate Baileys! They are one of the most addicting things I have ever made and here’s how I made them... 


Chocolate Bailey’s Nanaimo Bars

the base:

½ cup (114g) butter
¼ cup sugar
5 tablespoons cocoa powder
1 large egg, beaten
1 ½ cups rich tea biscuits, crushed
½ cup chopped mixed nuts
1 cup sweet and tender shredded coconut

Line an 8x8inch square pan with greaseproof paper. Make sure there is some over hang for easy removal. Melt the butter, sugar, and cocoa powder in a saucepan. Then add in the beaten egg and whisk quickly until it’s a thick glossy chocolate. Remove from the heat before adding in the crushed tea biscuits, chopped nuts, and coconut. Fold until combined and then press down into the prepared pan. Place in the fridge for at least 30 minutes. About 15 minutes in start the middle layer.

middle layer:

½ cup (114g) butter, softened
2 tablespoons & 2 tsp Chocolate Bailey’s
2 tablespoons custard powder
2 cups icing sugar

Beat the butter for a few minutes in a freestanding mixer until soft. Then add the Chocolate Bailey’s, custard powder, and icing sugar and beat until lighter in color and fluffy. It can take around 5 minutes. Then spread over the base layer, try to get it as flat as possible. Then chill while you make the top layer.

top layer:

114g dark chocolate
1 ½ tablespoons butter

Melt the chocolate and butter together in a heatproof bowl over a simmering pot of water. Once it’s completely melted very gently spread it over the middle layer. Place in the fridge for about an hour before cutting into squares.


NOW CLOSED

How to enter: 

OXO GOOD GRIPS Giveaway

notes: in association with OXO please see contact/policy page for more information. I bought the Bailey’s they are in no way promoting this post. Recipe adapted from Cakespy Presents Sweet Treats for a Sugar-Filled Life by Jessie Oleson.

Turtle Cupakes {recipe}


In the USA we have this caramel pecan chocolate that is called a Turtle. It’s called a “turtle” because when DeMet’s Candy Company created the delicious chocolate treat one of the workers pointed out that it looked like a turtle!

I would have to agree it does sort of look like a turtle, but even if it doesn't look like a turtle or not it is irrelevant! Because the combination of chocolate, caramel, and pecans is amazing!
If you ever are in the Mid-West (where I am now!) and you are able to visit a Culvers they do a Turtle Sundae and it’s very good! It’s vanilla frozen custard topped with caramel sauce and chocolate sauce and topped with pecans!

I've based this cupcake on that. So, I have a chocolate cake, filled with caramel sauce, topped with vanilla buttercream, drizzled with caramel and chocolate sauce and pecans!

Seems like a lot, but it’s totally worth it! Trust me!


Turtle Cupcakes

100g plain flour
20g cocoa powder
140g golden caster sugar
1 ½ tsp baking powder
pinch of salt
40g unsalted butter, room temp
120ml whole milk
1 egg
¼ tsp vanilla extract
caramel

Heat the oven to 170C and line your cupcake pan with 10 cupcake cases. Beat the flour, cocoa, sugar, baking powder, salt, and butter until it’s a bit crumby! Combine the milk, egg, and vanilla together before gradually adding it to the crumby mixture. Once combined beat on high for a minute or two to make sure there aren’t any lumps and the mixture is smooth.

Using a trigger scoop fill each of the cupcake cases just about half way. Bake for 20-25 minutes. A skewer should come out clean. Leave to cool completely before using the Cupcake Corer to take out the middles and add about a teaspoon of the caramel to the middles. Put the sponge bit back in and top with the vanilla frosting!

vanilla frosting:

250g icing sugar, sifted
80g unsalted butter, room temperature
2 tbsp whole milk
½ tsp vanilla extract
100g pecans, chopped
chocolate sauce
caramel sauce

Beat the icing sugar and butter together until it's completely combined. Add the milk and vanilla extract and beat until smooth and at your desired constancy! Top each cupcake with the frosting before drizzling over the chocolate and caramel sauce and sprinkling the chopped pecans on top!


To help me make these cupcakes I used an OXO Good GripsTrigger Scoop to fill my cupcake liners, an OXO Good Grips Cupcake Corer to take out the middle of the cupcakes, and an OXO Good Grips Cupcake Icing Knife to ice my cupcakes!

If you would like a chance to win these items so you can make these cupcakes at home follow the instructions in the Rafflecopter below! Good Luck! I look forward to reading your comments!

a Rafflecopter giveaway *giveway closed 


notes: In association with OXO Good Grips, please see my contact/policy page above for further information! Recipe is adapted from the hummingbird bakery cookbook

Happy Birthday Mr. President

In May of 1962 Marilyn Monroe sang ‘Happy Birthday’ to the President of the United States in a sexy sultry way that has made history.

First it was one of her last public performances, but mostly because of the alleged affair between her and JFK.

Not gonna lie I love a good conspiracy! Did they have an affair? Did JFK have anything to do with her death? We will never know!

If I don’t step away I can drive myself crazy with that sort of stuff. So, I will leave the conspiracies to theorists and I will get on with the cake making!

I am a little behind in posting this cake, it was about a month ago that a friend’s son was turning 21, and he requested this cake for his birthday.

The cake was a marbled vanilla and chocolate tray bake with a layer of buttercream before the top layer of white sugar paste.

Our friend gave me the stencil- that was super useful! So, with the stencil and my cake painting knowledge from Sprinklebakes I made this:


It is a simple design, but it has a bold stylish effect. The color pastes were gently mixed with a little vodka to make it easy to spread out and it turned out exactly how we all wanted it too!


I also gave them a pan of chili brownies because they were the same friends that requested chili brownies and told me they weren't hot enough! So, this time I added a bit more chilies to the brownies and they said they did have a bit more of a kick to them! I guess I will have to up my game again! 

Why American's Call Football, Soccer (USA Cake)

As usual it was a British word first. I do have a discussion about once a week about words I use as an American over the words used around me here in England.

Soccer is shorthand for association. As in Association Football, it was a way to distinguish it from rugby. Originally Britain had Rugby Football shortened to “ruggers” and Association Football was shortened to “soccer.”

It's not an American word at all, it was a British word... “And the Brits used it often—until, that is, it became too much of an Americanism for British English to bear." (Uri Friedman: a senior associate editor at The Atlantic)

I do find it interesting that what makes America different is not what America did, but what other countries did to make it different.

No matter if it’s called soccer or football I am staying up for tonight’s Ghana vs USA and eating a slice of this cake I made in support of the USA team!


It’s a basic vanilla cake with red and blue swirls. It has a vanilla buttercream underneath the fondant. I used blue and red food color paste with a little vodka with a stencil of the USA soccer shield! 

They have a tough first set, but I think they will put up a good fight!


Are you watching the World Cup? What team are you supporting?

me in the 2010 USA World Cup jersey
GO USA!

notes: Information and quote comes from Uri Friedman’s article here. Sprinklebakes book inspired the painting on fondant!

Killer Zebra Cake {Clandestine Cake Club}

This month’s Clandestine Cake Club theme was “A Novel Idea” where we could create a cake inspired by any book we wanted!

I have several novels and childhood books that I have been inspired by to create edible treats from. Two years ago I had a whole week dedicated to Harry Potter treats. I made a dessert inspired by Neil Gaiman’s An Ocean at the End of the Lane last spring. It’s something I enjoy doing!

Sunshine by Robin McKinley was where I decided to draw my inspiration from this time.

It is a book I have read more then once and have come to love. It sounds like a nice sunshine and roses book, but it's far from it! That's all I'm going to say about that! 

It was a bit of an easy one as the main character Rae aka Sunshine works in a bakery.

She creates all sorts of delicious sounding desserts like Cinnamon Buns as-big-as-your-head, Hell’s Angel’s Food, Killer Zebras, a 6 layer chocolate chip cake, Bitter Chocolate Death, Butter Bombs, Cherry Tarts, Lemon Lechery, and many more.

I've always admired Robin McKinley’s creativity when it came to naming the desserts. I also always wondered where her inspiration came from for the names? Did she have certain desserts in mind?

Originally I was going to make a Bitter Chocolate Death Cake, but someone was suppose to bring Bruce Bogtrotter’s cake from Matilda. So, I thought since there were to be two very chocolaty cakes I would make something else. I needn't have worried as they didn't show, but ah well.

I just liked the way Killer Zebra’s sounded so, I made a stripy cake and the tasty frosting makes it “killer!” Um..hum yeah. Anyway .... It was a pretty good cake, not as rich as expected, but a perfect sweetness to a soft crumb. Yum!


Killer Zebra Cake:

260g unsalted butter, room temperature
420g caster sugar
4 medium eggs
430g plain flour, sifted
1 tbsp baking powder
pinch of salt
1 tsp vanilla extract
240ml whole milk
30g cocoa powder, sifted

Preheat oven to 180C conventional & fan assisted/gas mark 6. Prepare 2 15cm round cake tins, greased and lined.

Beat the butter and sugar together until light and fluffy. Add the eggs one at a time and beat until completely incorporated, scrap down after each egg. Remove half of the batter and set aside.

In a bowl sift the flour, baking powder, and salt together. Half it. In one half sift in the cocoa powder. Set both bowls aside. Measure out the milk, set aside.
In one half of the butter mixture add a half of the half of flour (so you’re adding a quarter) mix well before adding the vanilla and half of the milk. Then add the rest of the flour (another quarter to make half) mix well. That is your vanilla batter.

In the other bowl of batter mix in half of the cocoa flour, mix well before adding the rest of the milk, make sure that is well incorporated before adding the rest of the flour and mix well, but don’t over beat.

To create the zebra stripes, spoon about 3 tbsp of the vanilla batter into the center of each prepared pans. Then add 3 tbsp of the chocolate and repeat until the batter is gone. It will spread out don’t worry! Do not level out the top! Whatever you do it will work out.

Bake for 25-45 minutes depending on your oven. I used a conventional oven and it took at least 45 minutes, but the recipe suggests a fan-assisted oven 25-30 minutes. Use the skewer test to make sure it’s completely cooked. Cool in the tins for about 10 minutes before removing them and cooling completely on a wire rack.

vanilla buttercream

100g unsalted butter, softened
300g icing sugar, sifted
1 tsp vanilla extract
75ml double cream

Beat the butter for a few minutes before adding the sugar, vanilla, and cream. Beat on low, you don’t want icing sugar everywhere! Then once it comes together beat on high for a few minutes until it’s nice and smooth!


It was a very quiet night. I don’t know if it was due to the flooding around the Reading area, but there wasn’t the best turn out. Sometimes it is nice when it’s quieter as we get to chat and get to know each other a bit better! I always really look forward to "Cake Club night as my" girls call it. They also always remind me to save them some cake!

Louise made an amazing Lemon Sherbet Cake inspired by Dumbledore from Harry Potter. Clara and Fiona brought a delicious cherry cake in ode to Enid Blyton. Clare created an orangey loaf cake, that I can’t remember for the life of me what book it was suppose to be from! It was good though! I look forward to our next meet-up!


notes: Clandestine Cake Club: fine one near you! HarryPotter Week; Forgotten Blackbery Pudding inspired by Neil Gaiman, AmericanCupcake Life has a book club that is run by reading the book and creating something inspired by the book, I partake as often as I can! Recipe was taken from Lily Vanilli’s Sweet Tooth.  

Bea Arthur Cupcake from Robicelli's: A Love Story, with Cupcakes

Earlier this week I made Cinnamon Bun Cupcake from Robicelli’s: A Love Story, with Cupcakes. I had loads of leftover French Buttercream so I made more cupcakes…

…I didn't want to waste the frosting!!

Honest! That and I wanted to try another recipe.

The Bea Arthur cupcake is Black Coffee Chocolate Cake with Cheesecake Buttercream and an Espresso Ganache.

All I had to do was add some vanilla to the leftover frosting and I had Cheesecake Buttercream. It was the perfect combo.

I hadn't left the cold buttercream come to room temperature before whipping it up with the vanilla (I used vanilla bean paste) so it wasn't as smooth as the previous cupcakes.

Ah well, they were still delicious. Soft and rich and delicious! I was a lot happier with these cupcakes.

Mr Knightley teases me about my moods when something I make doesn't turn out how I wanted. Basically I’m like a toddler having a bit of a tantrum. Even though my logical mind tells me that I’m being silly for being annoyed, it doesn't stop me from being annoyed.

There is always something to learn no matter if things go according to plan or not. As my daughter’s fortune cookie said “When you lose, don’t lose the lesson.”

The lesson? When at first you don’t succeed try try again? or Look to the brighter side? 

That’s a good enough lesson for me, especially when talking about cupcakes…


notes: My review of Robicelli’s: A Love Story, withCucpakes. Refer to the “about me” page if you want to know who Mr. Knightley is. There are plenty of 

Cinnamon Bun Cupcakes from Robicelli’s: A Love Story, with Cupcakes {a book review}

I had read a few reviews for Robicelli's: A Love Story, with Cupcakes, in various places before staring at it in my wishlist on Amazon, then moving it to the basket, then back to the basket and so on…

I have an excessive collection of baking/cook books. So, its kind rare for me to purchase one, even though I covet loads of titles, these days. I’m running out of space and I do get anxiety attacks.

Basically if I know I have 2 or more recipes for the same type of cake or dessert I’m after I panic because I want the one that’s the best. However I am well aware that if I don’t try them out how will I know which is the best. I just don’t always want to try them all out; I just want the best right now. Then I wonder well, what if there isn’t one that is better then the other? What do I do then? Maybe I should make something else?

Hence the anxiety attacks I get over deciding what to make because I have so many cookbooks. We won’t even go into meal planning…. 

Yet, even though I know all this I still love a good book about food. And that is why this one stood out to me. All the reviews said how well written and funny it is.

Then one day, as I went to stare at it in my wishlist, Amazon informed me that there were only 9 copies left! Well, that just started another anxiety attack and now I am the proud owner of one of those 9 copies! 

I haven’t been back to check if they are fully back in stock, but I would have to assume so.

I read the book front to back and all the other reviews were right it’s laugh-out-loud funny, but what I really liked best was how real it was.

When you read a book or sometimes even blogs only the good things are there in black and white and we think: “How lucky are they to be where they are!” or “There life is perfect! I wish my life were more perfect.” But life isn’t like that. I guess I just appreciated that it shared the good, the bad, and the funny.

As I’ve been homesick lately I chose to try out the Cinnamon Bun Cupcakes first. I do like my cinnamon and these are full of it! They are good, but not exactly what I was expecting. Which I guess isn’t fair, as I really just want a proper cinnamon roll.

The cakes tasted good, but were heavier then I like them to be and the cinnamon goo sunk straight to the bottom. It’s probably due to something I did. I may have over mixed or converted the butter from sticks to grams wrong? The homemade butterscotch was good. So good, that it has finger impressions in it. Usually mine.

Then I thought I’d try this French Buttercream that they promote throughout the book. However, I found it to be a bit rich.  Maybe I don’t have a sophisticated enough palate for frosting that might as well be a slab of butter creamed and slapped on the top of a cake? Maybe it would be better on a different cake like their Bea Arthur cupcakes, which is a black coffee chocolate cake? Maybe I should make them I have plenty of frosting leftover?

If not I will use their tip of freezing the leftover buttercream in ice cube trays and using it for pancakes!

The recipes throughout the book are refreshing and far from the cute cupcakes being sold across the world. They make everything from scratch, but give tips on how to cut corners if you must. I have lots of others I’d like to try despite my not so great first attempt.

One recipe does not a cookbook make.

I will let you know how I get on with any other recipes I try!


notes: I read once that if you have more choice your brain thinks it’s an important decision. Therefore you find it harder to make a decision and likewise easier if you have fewer choices. I need to learn how to make myself proper cinnamon rolls. I bought myself a copy as stated above. Amazon is probably the only place you can buy this book in the UK as it’s a USA publication. Saying that it is in cups, sticks of butter, ounces and there are some things that aren’t readily available in the UK. Like Corn Syrup, I found mine at a big Tesco’s in their World Food section. 

Cinnamon Cake & CCC Christmas Cakes!

We had our last Clandestine Cake Club meet-up of 2013! Of course being the holiday season we went with Christmas as our theme!

As always we had a nice selection of cakes and I tried to eat a slice of each. Which never goes well. I either miss one or two or end up with a load of half eaten slices on my plate! 

Once again, everything was very tasty. I never can complain about our group of cake makers!

Here is what we all made this time round:


I choose a Cinnamon Cake with Cinnamon Butter Cream because everything people bake this time of year has cinnamon in it. Well, pretty much everything!

The Cinnamon Cake turned out perfectly cinnamon-y and delicious! It was a bit like making muffins. All you do is combine all the dry in one bowl and the wet in the other. Then place in the tin and bake! So, a very minimal effort cake, but a very good cake!

Cinnamon Cake

225g self-rising flour
1 tsp baking powder
1 tbsp ground cinnamon
75g ground almonds
100g golden caster sugar
2 medium eggs
50g honey
250ml natural Greek yogurt
150ml sunflower oil

Preheat oven to180C/350F/gas4 and line the bottom of a 9 or 10 in cake tin and grease the sides with oil. I used a 10in as I don’t own a nine and it came out fine with the time below.

Combine all the dry ingredients by sifting the flour, baking powder, and cinnamon before adding the almonds and sugar.

In a separate bowl combine all the wet ingredients eggs, honey, yogurt, and oil – mix well.

Fold the wet mixture into the dry until just combined.

Gently pour into the prepared tin and bake for 35 minutes. Cake should have a golden hue and a skewer should come out clean when inserted into the cake. Cool for 10 minutes or so in the tin, before completely cooling on a wire rack.

Cinnamon Buttercream

200g butter, softened
150g icing sugar, plus a little more depending on how you like the consistency
1 tsp ground cinnamon
1 tsp vanilla extract
2-3 tbsp whole milk

Beat all the ingredients together until you get your desired consistency and it is light and fluffy! Use more or less milk for the same reasons you may need a little more icing sugar.

to finish

Snow Flake Sprinkles (optional)
Chocolate Penguins (optional) 

Evenly spread the buttercream over the cake and decorate as desired!


notes: How many C’s can I get in a title of a post?? Clandestine Cake Club is fun! Find one near you! This cake was adapted from a recipe in Cake by Rachel Allen. Chocolate Penguins are from Sainsbury’s, I bought them as I thought they were super cute! I must apologize for the quality of the pictures, the lighting is never nice to my phone camera!

No Fear Gluten-Free Birthday Cake!!

This cake is for all those who are gluten intolerant and have missed out on birthday cakes. But have no fear, this cake recipe will make sure you never have another birthday with out a delicious cake!

A friend of a friend was celebrating her daughters 21st and was after a gluten-free cake and my name came up! I was happy to do it, as it must be difficult to get a hold of a tasty gluten-free cake.

Not that I would know really. I have never looked for gluten-free cakes in the area. However I came across this recipe and I think it's pretty good. I was told the birthday girl was pleased and that they all agreed the cake was tasty! 

I really enjoyed the challenge of this cake and would happily do it again. The cake layers were very dense, but the scrapes of the chocolate layers I tried were very moist and good. My 2 little ones at up all the scrapes and wanted more so I would say it was an over all success!

Here is how I made it! It looks and sounds a bit lengthy and difficult, but it really isn't. I finished it all in a few hours, no longer then most layer cakes. So, don't be afraid and give it a go!


Gluten-Free Birthday Cake
vanilla layers:

300g Dove’s gluten-free plain flour
1 tbsp of baking powder (check that it is gluten-free)
pinch of salt 
140g unsalted butter, melted
200ml whole milk
150ml sunflower oil
350g caster sugar
4 medium eggs
2 tsp vanilla extract/paste

chocolate layers (half the recipe above)

150g Dove’s gluten-free plain flour
pinch of salt
½ tbsp baking powder, error on the side of more then less
70g unsalted butter, melted
100ml whole milk
75ml sunflower oil
175g caster sugar
2 medium eggs
*1 tbsp cocoa powder
*1 tbsp hot water

~ Instructions are the same for both sets of layers I will (*) where things are different. ~

Preheat oven at 180C/gas4 Grease and line 2 8in (20cm) round cake tins and one 8 in (20cm) square cake tin for the chocolate cake. Line them properly (I cheat a lot when lining cake tins) as the batter is very liquidy.
Sift the flour, baking powder, and salt. Mix the melted butter, milk and oil together. In a large bowl or in the bowl of a stand mixer whisk together the sugar, eggs, and vanilla. *For the chocolate layer mix the cocoa powder with the hot water to make a smooth paste. Then whisk together the sugar, eggs, and chocolate paste.
Add about 1/3 of the wet mixture to the sugar and egg mixture, then 1/3 of dry mixture and repeat until everything is used up. Pour the cake into the prepared cake tins. Bake for 40-50 minutes, until a skewer comes out clean. *I baked the chocolate layer for about 30-40 minutes as I put it in the over after the other two layers were already baking. Cool for 10 minutes in the tins, before turning out. Then place on a cooling rack, with the baking paper still on, until completely cool.


Vanilla Buttercream:

300g butter, at room temperature
525g icing sugar
2 tsp vanilla extract
2-3 tbsp of milk
very little red paste or use pink paste or which ever color you want

Beat the butter until smooth then add the icing sugar little by little until combined and mostly smooth. Add the vanilla extract and the milk, 1 tbsp at a time. You may only need 2 so just watch it. If it’s too smooth add a little more icing sugar. Beat in the color paste until it is evenly distributed.


to finish:

raspberry jam
sprinkles of choice
candles

Once the cake layers are cool remove the baking paper and lay on a cake board or plate. Spread 4 or so tablespoons of raspberry jam across the bottom layer. Place the other vanilla layer on top.
Using a 3 7/8 in or 98mm circle cutter cut out 2 rounds from your square chocolate cake. Spread about 1-2 tbsp of jam on one side of the chocolate circle and center it on top of the vanilla layers. Spread more jam on top of that before placing the last circle on top.
Gently spread a crumb layer on top of the cakes before laying a proper layer on the tops of both cakes.
Then using a piping bag and star nozzle pipe around the base of cake and work up. Repeat on the smaller cake. The last row of piped stars should sit around the top layer of cake.
Decorate however you want! Do double check that the sprinkles and decorations if not homemade are in fact gluten-free.


I bought decorations that weren't all gluten-free and not knowing the extent of the recipients allergies I gave her mom the decorations to use at their discretion. The picture at the top was sent to me after they decorated it and the picture below of the cake sliced open was also sent to me to share with all of you! 


notes: I stated that I used Dove's plain gluten-free flour, because I am not sure if it matters or not. Do gluten-free flours vary? I am unsure so I wanted you to know exactly what I used. You could always add the quantities together, then divide into the 2 round cake pans, with what’s left add the chocolate paste. That would be way easier and save on time, but this is how I did it. I would still do it the way I did it because I’m a bit particular like that. If you wanted to reverse the flavors of the layers, I would use 3 tbsp of cocoa powder and hot water to make it extra chocolate-y. You could also make more buttercream and layer between the layers. Recipe adapted from Fussy Eaters recipe book by AnnabelKarmel; please email me or leave a comment with any questions on how to make this cake if I have not made it clear enough.