Showing posts with label Flour. Show all posts

Pumpkin Pie - Post Thanksgiving {expat pro con list}


I’m not like other bloggers.

Other bloggers were going on about Thanksgiving since the first of November, I’m mentioning it today the last day of November - a time when other bloggers are shouting about Christmas.

I live in the now, not in the future. Which means that when I get around to blogging it’s the past. I suppose next year I will have this post to share early….just thinking out loud.

Celebrating Thanksgiving as an expat is an experience in itself. I’ve made a Pro/Con list to try to explain.


Pro and Cons of Thanksgiving as an ExPat: 

Pros: 


  • You can buy a turkey on the day, because no one else needs one. 
  • Pumpkin Pie 
  • If you get tonsillitis and need to cancel Thanksgiving no one really misses out but you.
  • Having those friends try Pumpkin Pie!
  • No pressure
  • Inviting friends to celebrate with you.


Cons: 


  • Having to give history lessons to friends and family about what Thanksgiving is. 
  • Having to have it on the following Saturday because the Thursday isn’t a day off. 
  • Having to source a pumpkin or pumpkin puree (Waitrose stocks Libby’s Pumpkin Puree) 
  • Not having my family around. 
  • The lack of Thanksgiving decorations.


I went from not celebrating it at all because as a 22 year old I didn’t cook. Then I tried having it Thursday after my husband got in from work, but that was a stress and way too much to eat at 6 or 7 o’clock in the evening. Then I moved it to Saturday, which worked until one year I got tonsillitis and had to cancel because no one else was around to take up the cooking it was all me or nothing. It seems more hassle then not these last few years, but it’s something I want my girls to see as a holiday even if the rest of the country doesn’t.

One day I hope they love Pumpkin Pie as much as I do. I remember my first taste of pumpkin pie was after we moved to Terre Haute, Indiana and had Thanksgiving with one of my dad’s co-workers who invited us to his house. It was a big affair with loads of people. My fifth grade teacher was there and it was super weird seeing him there.

Food has always been used to celebrate and I hope to pass this recipe down to my girls one day. It’s not an original or anything I got it from Joanne Chang of Flour bakery in Boston, Massachusetts, but it’s super good and all recipes come from somewhere!


Pumpkin Pie 

Short Crust Pastry Pie Crust

140g plain flour
1 tablespoon sugar
1/4 teaspoon salt
128g unsalted butter, cut into 8/9 cubes
1 egg yolk
2 tablespoons cold milk

Mix the flour, sugar, and salt together. In a freestanding mixer or with a handheld mixer mix in the 8-9 cubes of butter. You want the cubes fairly big because you don’t want them completely incorporated into the flour mixture. You want lumps of butter in the dough.
Gently beat the egg yolk and milk together and add it to the flour mixture. Beat on low until the dough just comes together, it will not be a smooth dough … yet.
Dump out onto a lightly floured surface and bring the dough together as best you can into a ball. Then smear the lumps of butter into the dough by using the palm of your hand and pushing the ball down and away from you. Turn the dough ball and repeat for 4 turns or so or until the butter is stretched through out. Bring it back together into a round disk, wrap with clingfilm and place in the fridge for a minimum of 4 hours. I always make this the night before I want my pie.

Pie Filling

454g (1 can) pumpkin puree
150g light brown sugar
1 teaspoon ground ginger
1 teaspoon ground cinnamon
1/2 teaspoon ground nutmeg
1/8 teaspoon ground cloves
1/2 teaspoon salt
200g condensed milk
170g evaporated milk
3 eggs
1 egg yolk
180g double cream
1/2 teaspoon vanilla extract

Remove the shortcrust pastry from the fridge and roll it out between to sheets of cling film or on a lightly dusted work top, to about 1/8 inch (.32 cm) thick and about 12 inches (30 cm). Line a pie tin/pan/plate trim or crimp the over hang. Don’t trim it too much as there will be shrinkage in the oven. Leave to chill in the fridge for at least 30 minutes.
While you wait heat the oven to 180C or 350F.
Line the pastry with greaseproof baking paper and fill with baking beads or your choice of dried grains and blind bake for 35-45 minutes.

While it’s baking make the filling by mixing the pumpkin puree and brown sugar in a meduim sauce pan over a medium heat, stirring until it’s a thick paste 35-40 minutes or so. It will have reduced almost by half and be a lot darker. 
Whisk in the spices: ginger, cinnamon, ginger, cloves, and salt. Then whisk in the condensed and evaporated milk.
Beat the eggs and egg yolk with the cream until combined before gradually whisking it into the pumpkin mixture.

Remove the baking paper and baking beads from the baked crust and add the pie filling. Place in the already heated oven for 45-50 minutes until the pumpkin filling is set, it will puff up a little, but the middle should still have a little wobble. Leave to cool for 2 hours before serving.
When it’s ready to be served top with whipped cream or make it al a mode with a scoop of ice cream. I used a cinnamon biscuit ice cream that suited the pumpkin pie perfectly!

notes: as mentioned above this recipe is adapted from Flour by Joanne Chang, another version of this recipe can be found here. I reviewed both flour and flour too here on the blog. My cousin reviewed it as well and went for a book signing back in the day she wrote about her experience here!
I am entering this into my own blogging challenge The Pastry Challenge! with my friend and fellow blogger Jen!

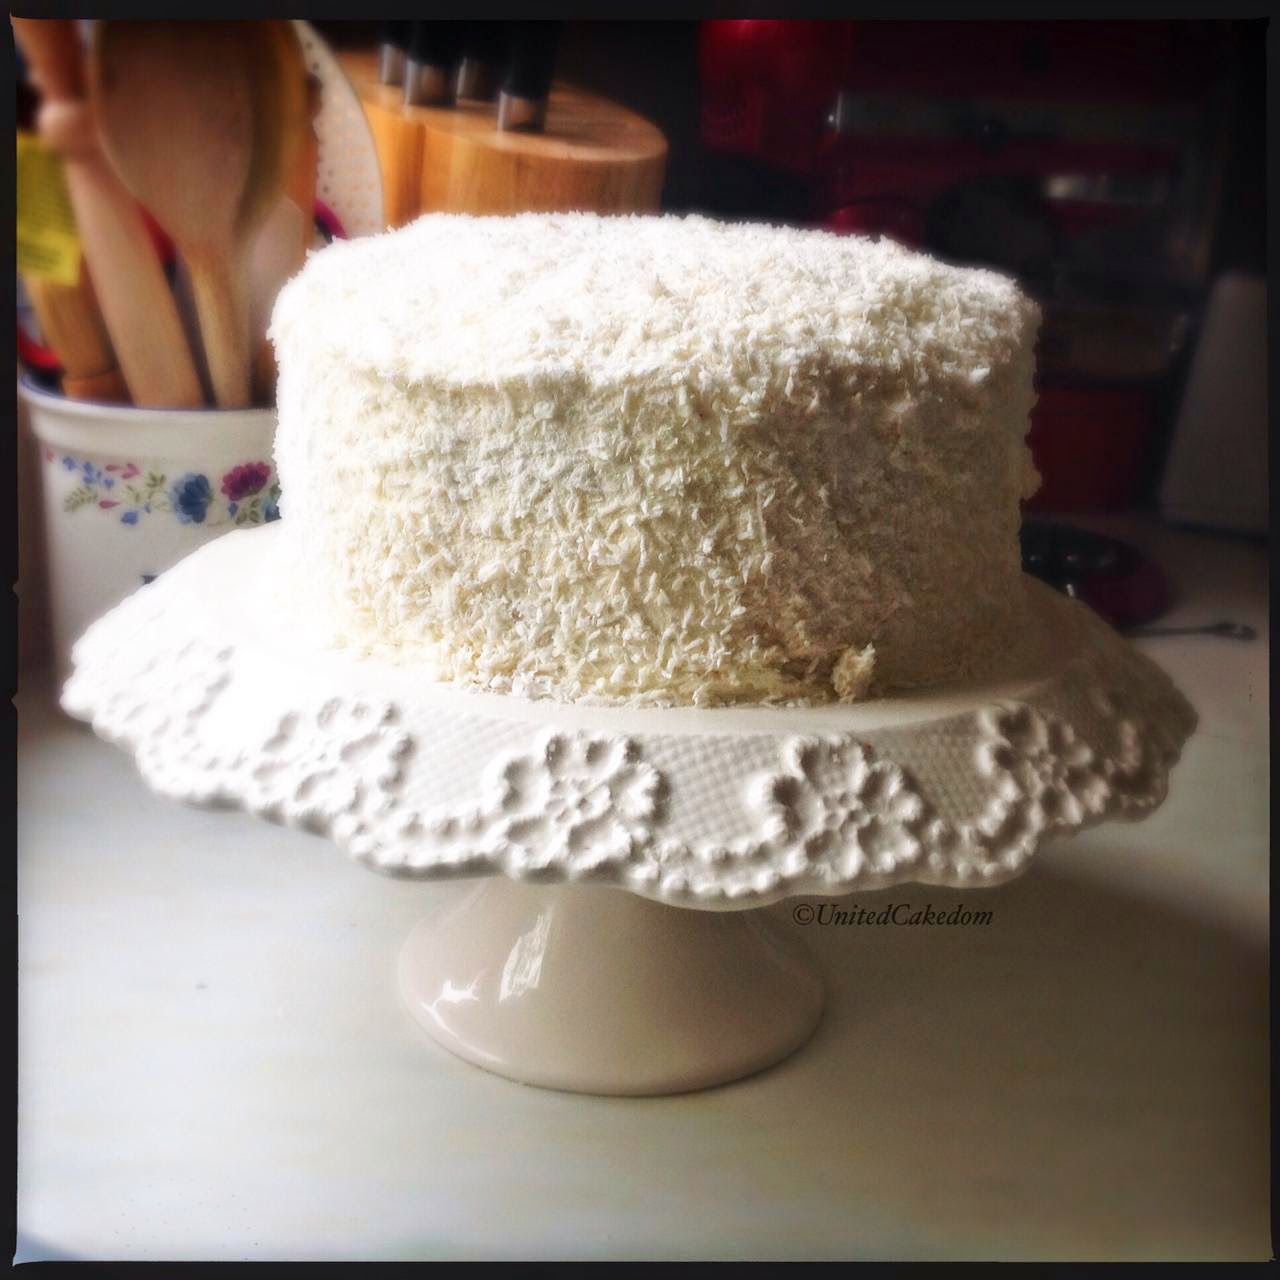
Coconut Lover Coconut Cake

There are either coconut lovers or coconut haters. It’s a rare thing to be an “in-betweener” when it comes to coconut.

It’s like having a rare blood type.

I happen to be a coconut lover. I love it in baked goods and in savory dishes. It is also one of those flavors that pairs well with a variety of fruit.

But for this cake it was all coconut: coconut cake with coconut frosting!

I actually made this cake a while back when I was hosting my friends with a chili night! It all started when I was asked if I made cornbread.

Of course I said yes and then before I knew it my girlfriends were round for chili with cornbread and a coconut cake for dessert. I felt like staying with the Southern American feel of the meal.

The cake was soft and spongy and the frosting was smooth and silky both with the right amount of coconut flavor! 

We had some great food that night, if I do say so myself. That coupled with the great company was a very good night! Who could ask for more?

They did ask for the recipe, which I still haven’t gotten to them so I thought, might as well pop it on here!


Coconut Cake:

235g plain flour
4 tbsp corn flour
2 tsp baking powder
¼ tsp salt
170g unsalted butter, room temp & cubed
6 egg whites
240ml coconut milk
120g sweetened shredded coconut
1 tsp vanilla bean paste

Heat the oven to 180C. Grease two round (8in) cake tins lightly flour, tap out any excess flour.
Sift the flour, corn flour, and baking powder into the bowl of a mixer or a large bowl if hand mixing it. Mix in the sugar and salt until combined. While mixing on a low speed add the butter cube by cube and mix until the mixture is coarse and crumbly.
In a separate bowl beat the egg whites, coconut milk, shredded coconut and the vanilla paste until well combined.
Add half of the wet mixture to the dry and beat until combined. Scrap the sides and bottom of the bowl before adding the rest of the wet mixture. Mix on a medium speed for about 25 seconds, it should be light and fluffy.
Divide the batter between the two prepared cake tins. Bake for 30-40 minutes. The tops should be a light brown and should spring back when lightly pressed. Let cool completely in the pans before removing.


Coconut Frosting:

300g caster sugar
6 egg whites
342g unsalted butter, room temp &cubed
1 tsp vanilla extract
¼ tsp salt
160ml coconut milk

While the cakes are cooling and not before because the frosting needs to be used pretty much right away and it won’t go well on a hot cake!
In a heat proof bowl mix the sugar and egg whites together, place on top of a simmering pot of water (make sure the bowl does not touch the water) and whisk for 6-8 until the sugar dissolves. It will thin out as the sugar dissolves.
Then place the mixture into the stand mixer and whip with the whisk attachment for 6-8 minutes on a medium speed until it’s cooled down and turns into a light meringue.
Turn the mixture down to low and add the butter cube by cube. Once all the butter is incorporated turn the mixture up to medium and whisk for 4-5 minutes, it will look curdled at one point, but keep mixing it will come together to be smooth and glossy.
Then add the vanilla extract, salt, and coconut milk and whisk for about 1-2 minutes or until smooth.

to finish:

120g sweetened shredded coconut

Remove the cakes from the tins and level them if necessary. Place one layer on a serving plate or cake stand or whatever you have before dolloping a bunch of frosting on top of the layer.
Smooth it on the top and down the sides before carefully placing the second layer on top, upside down so the sharp edges are on top.
Add a thin layer of frosting as a crumb coat and let it set before adding the rest of the frosting. Once it’s frosted coat the cake in the shredded coconut!


notes: This recipe is adapted from flour by Joanne Chang. 

Flour Focaccia & Sweet Potato w/Thai Curry & Coconut Soup

This time last week I posted a book review for flour, too and today I'm sharing with you what I made from it so far!


I made focaccia, the bread that makes all the flour sandwiches great! I don't think mine would pass the test though. I might have pulled them out a little too early and they were all smooshed together so came out all sorts of shapes, but I'm happy with them. So, I think that's all that matters.


To go along with the sandwiches I made Sweet Potato with Thai Curry and Coconut Soup. Do to schedule upheavals I didn't eat the bread with the soup. But the soup was delicious!! I love a good soup and this is a good one! I know I'll be making this one again, but not before I try a few more from this book! 


flour, too {book review}

If you ever wondered how a successful bakery/café is successful, then you must read Joanne Chang’s second cookbook flour, too.

Flour is a bakery that currently has four different locations in the Boston area. I’m not lucky enough to have ever lived or visited Boston before and therefore I have never visited the café before. I will have to get to there next time I am stateside, if not for the bakery, for my cousin who is lucky enough to live there and has had nothing but praise for flour.

In flour we read all about the sweeter side of the bakery, in flour, too we get to divulge into the savory side: sandwiches, soups, dinners, party food, and of course dessert!

Joanne holds nothing back and gives very detailed instructions on how to reproduce flours goodies at home. Which can seem a little daunting, but as I just said the instructions are very clear and in-depth. You should have no problem if you take the time and read through the recipe and prep ahead of time.

It’s one of her tips in the introduction; you know how TV chefs/cooks always have everything prepped and ready? Joanne says that is a key to success! She also is really good at telling us when something can be done ahead of time and how long it will keep.


As Joanne is professional trained, at many different restaurants around the US, she likes to weigh her ingredients when baking. So, us UK cooks and bakers can cook and bake by weighing everything like we normally do! No need to rush out and get a set of cups for this book!

You may recognize Joanne from an episode of James Martin’s United Cakes of America program on. In an episode when he’s visiting Boston, he stops in at flour and makes brownies with Joanne. They make them the flour way and with an old early recipe for brownies to compare.


Normally at some time in my book reviews I like to list what I’d like to make from the book. Sort of like a wish list. As I started writing the list out I realized I’d like to make pretty much everything in the breakfast section sweet and savory, everything in the soup section, and everything in the dessert section. I also want to make a good number of things in the sandwiches, salads, mains, snacks, and drink sections too! It was just too much to list!

I’m constantly looking for inspiration when I’m meal planning and I have found plenty with flour, too! I can’t wait to share with you what I make first. It’s going to be a soup for sure, still undecided to which one, and flour’s signature focaccia! Then if I can get myself sorted I might have a go at the Classic Apple Turnovers or maybe the Best Boston Cream Pie? So much to make and so little time!


notes: flour café official site; flour Amazon UK & US; my cousin I mentioned above had her copy of flour (book 1) signed and wrote about it here on a book blog we both contributed to! James Martin’sUnited Cakes of America

How to Make Cake Flour

As far as I am aware Cake Flour isn't available here in the UK. I have in the past just substituted plain flour and ended up with varying results. Therefore I wouldn't suggest doing that.


After a little research I have found the secret to making my own. You will need a US measuring (1) cup, a measuring tablespoon, plain flour, and corn flour (known as corn starch in the US).


Place two tablespoons of corn flour into your measuring cup.


Then fill up the cup with plain flour. I usually pour my flour into the cup because the bag is hard to get a cup in and out of without making a huge mess.

If you are of the dipping and leveling then do that with your flour, then take out 2 tablespoons and add in 2 tablespoons of corn flour. Which ever method is easiest for you.


I have a few cakes and bakes to make that are American that require Cake Flour so I made 2 cups to start with. It's so easy that you can make it as you need it or make it in advance and store it in the cupboard!

The Big Breakfast Oatmeal Chocolate Covered Raisin Cookies!!


Seeing as these are OATMEAL chocolate covered raisin cookies I assume they are prefect for breakfast. I mean I eat oatmeal with raisins for breakfast sometimes? Generally without all the butter and sugar… well usually with sugar. Plus it’s not like I would eat cookies every day for breakfast, there are way too many other breakfast foods I would miss.

Anyway as you recently are aware of my twitter addiction/problem it’s no surprise I saw the idea for these cookies from @SallysBakeBlog on Twitter. Sally tweeted a link to her Thick Oatmeal Raisinet Cookies and I told her what an ingenious idea I thought it was. I also said I was going to have to make them as soon as possible! And I did.

I didn’t use the same recipe from Sally’s blog, instead I used the Oatmeal Cookie recipe from Flour by Joanne Chang and just swapped regular old raisins for chocolate covered ones! Also over here in the UK we don’t get Raisinets so just a bag of regular no brand name chocolate covered raisins were used.

They were probably some of the best Oatmeal Raisin cookies I have ever had. The thing is they are so simple. Cookies are pretty versatile and the only way to make a cookie recipe really special is just by changing what you put into them. I won’t be posting Joanne’s cookie recipe, but David Lebovitz has, the link is in the notes below!


notes: {sally’s baking addiction}; David Lebovitz - Joanne Chang’s Oatmeal Cookies; If you have lived in the UK in 1992-2002 you may recognize the plate and cup (we have the bowl too) from the Channel 4 show The Big Breakfast! Please don’t worry I didn't eat 3 cookies for breakfast… I did share!

Sticky Sticky Buns!!

I have wanted to make these forever and I don’t know why I've waited so long! 

These are gooey, sticky, and extremely sugary! 

Check out my previous post, Joanne Chang’s book Flour, or this website to get the recipe for the basic brioche dough that you need to make these. 

What follows are the ingredients and instructions to create these Sticky Sticky Buns! 

Thank you Joanne for sharing these with the world! Enjoy!!

Sticky Sticky Buns:

Goo:

  • 3/4 cup (1 1/2 sticks; 170 grams, 6 ounces) unsalted butter
  • 1 1/2 cups (345 grams) firmly packed light brown sugar
  • 1/3 cup (110 grams) honey
  • 1/3 cup (80 grams) heavy cream
  • 1/3 cup (80 grams) water
  • 1/4 teaspoon kosher salt
  • Basic Brioche Dough, recipe in previous post
  • 1/4 cup (55 grams) light brown sugar
  • 1/4 cup (50 grams) granulated sugar
  • 1/8 teaspoon ground cinnamon
  • 1 cup (100 grams) pecan halves, toasted and chopped

Directions:

First, make the goo. In a medium saucepan, melt the butter over medium heat. Whisk in the brown sugar and cook, stirring, to combine (it may look separated, that's ok). Remove from the heat and whisk in the honey, cream, water, and salt. Strain to remove any undissolved lumps of brown sugar. Let cool for about 30 minutes, or until cooled to room temperature. You should have about 3 cups. (The mixture can be made up to 2 weeks in advance and stored in an airtight container in the refrigerator.)
Divide the dough in half. Use half for this recipe and reserve the other half for another use.
On a floured work surface, roll out the brioche into rectangle about 12 by 16 inches and 1/4-inch thick. It will have the consistency of cold, damp Play-Doh and should be fairly easy to roll. Position the rectangle so a short side is facing you.
Goo, filling, ready for rolling, all rolled up

In a small bowl, stir together the brown sugar, granulated sugar, cinnamon, and half of the pecans. Sprinkle this mixture evenly over the entire surface of the dough. Starting from the short side farthest from you and working your way down, roll up the rectangle like a jelly roll. Try to roll tightly, so you have a nice round spiral. Trim off about 1/4- inch from each end of the roll to make them even.

Use a bench scraper or a chef's knife to cut the roll into 8 equal pieces, each about 1 1/2-inches wide. (At this point, the unbaked buns can be tightly wrapped in plastic wrap and frozen for up to 1 week. When ready to bake, thaw them, still wrapped, in the refrigerator overnight or at room temperature for 2 to 3 hours, then proceed as directed.)

cut and set in goo

Pour the goo into a 9 by 13-inch baking dish, covering the bottom evenly. Sprinkle the remaining pecans evenly over the surface. Arrange the buns, evenly spaced, in the baking dish. Cover with plastic wrap and put in a warm spot to proof until the dough is puffy, pillowy, and soft and the buns are touching-almost tripled in size, about 2 hours.
Position a rack in the center of the oven, and heat to 350 degrees F.

Bake until golden brown, about 35 to 45 minutes. Let cool in the dish on a wire rack for 20 to 30 minutes. One at a time, invert the buns onto a serving platter, and spoon any extra goo and pecans from the bottom of the dish over the top.


The buns are best served warm or within 4 hours of baking. They can be stored in an airtight container at room temperature for up to 1 day, and then warmed in a 325 degree F oven for 10 to 12 minutes before serving. 

Yummy Yummy Sticky Sticky Buns!!

Brioche Loaf!!


I have had Joanne Chang’s book, Flour (same name as her bakery), for what seems like ages now and I have only got around to baking from it. I have an excessive amount of baking books. 

I have seen other blogs that have a much longer list, but as I am running out of room on my physical bookshelf I am inclined to think my collection excessive. It means I still have a book or two I have never baked from and I am trying to remedy that!

The number one thing I wanted to make in this book was/is her Sticky Sticky Buns, but to do that you need to make a batch of Brioche Dough! So, here’s the recipe for the dough taken from her book. It can also be found on the Food Network USA’s website (be aware that they don't have the full directions to carry one to make this loaf, it stops at the point you would make the sticky sticky buns). This is a first time success! I am very happy with the way the Brioche turned out- very light and moreish. (is that a British thing moreish?) Enjoy!!

Brioche Dough:

  • 2 1/2 cups (350 grams) unbleached all-purpose flour, plus more if needed
  • 2 1/4 cups (340 grams) bread flour
  • 1 1/2 packages (3 1/4 teaspoons) active dry yeast or 1-ounce (28 grams) fresh cake yeast
  • 1/3 cup plus 1 tablespoon (82 grams) sugar
  • 1 tablespoon kosher salt
  • 1/2 cup cold water
  • 6 eggs
  • 1 3/8 cups (2 3/4 sticks; 310 grams) unsalted butter, at room temperature, cut into 10 to 12 pieces
Using a stand mixer fitted with the dough hook, combine the all-purpose flour, bread flour, yeast, sugar, salt, water, and 5 of the eggs. Beat on low speed for 3 to 4 minutes, or until all the ingredients are combined. Stop the mixer, as needed, to scrape the sides and bottom of the bowl to make sure all the flour is incorporated into the wet ingredients. Once the dough has come together, beat on low speed for another 3 to 4 minutes. The dough will be very stiff and seem quite dry.
With the mixer on low speed, add the butter, 1 piece at a time, mixing after each addition until it disappears into the dough. Continue mixing on low speed for about 10 minutes, stopping the mixer occasionally to scrape the sides and bottom of the bowl. It is important for all the butter to be thoroughly mixed into the dough. If necessary, stop the mixer occasionally and break up the dough with your hands to help mix in the butter.

Once the butter is completely incorporated, turn up the speed to medium and beat until the dough becomes sticky, soft, and somewhat shiny, another 15 minutes. It will take some time to come together. It will look shaggy and questionable at the start and then eventually it will turn smooth and silky. Turn the speed to medium-high and beat for about 1 minute. You should hear the dough make a slap-slap-slap sound as it hits the sides of the bowl. Test the dough by pulling at it; it should stretch a bit and have a little give. If it seems wet and loose and more like a batter than a dough, add a few tablespoons of flour and mix until it comes together. If it breaks off into pieces when you pull at it, continue to mix on medium speed for another 2 to 3 minutes, or until it develops more strength and stretches when you grab it. It is ready when you can gather it all together and pick it up in 1 piece.


Put the dough in a large bowl or plastic container and cover it with plastic wrap, pressing the wrap directly onto the surface of the dough. Let the dough proof (that is, grow and develop flavor) in the refrigerator for at least 6 hours or up to overnight At this point you can freeze the dough in an airtight container for up to 1 week.


***
Here you can choose to make 2 loafs of brioche or make 2 batches of Sticky Sticky Buns or make one loaf and one batch of sticky sticky buns and last but not least if you have her book there are several other treats you can make with this basic dough!!


To make the brioche loaf, line your loaf tin (9x5) with parchment paper or butter the pans liberally. Divide the dough in half and press with your hand into a 9x9 inch square. The dough will feel like cold clammy Play-Doh. Facing the square, fold down the top one-third toward you, and then fold up the bottom one-third, as if folding a letter. Press to join these layers. Turn the folded dough over and place it, seam-side down, in the prepared tin.

Cover lightly with plastic wrap and place in a warm spot to proof for 4-5 hours, or until they have nearly doubled in size. They should have risen to the rim and be rounded on top. It should feel soft, pillowy, and light as if filled with air, which it is!


Position a rack in the center of the oven and heat to 350F/180C
Whisk the remaining egg and gently brush the top of the loaves.
Bake for 25-45 minutes. The time is so wide because if you bake two loaves at a time you will need longer. I however only needed 30 minutes to bake one loaf. Everyone’s oven is different so start checking it at 25 minutes. The tops and sides should be completely golden brown. Let the loaf cool in the pan on a wire rack for 30 minutes; then turn out and leave to cool completely.
The bread can be stored tightly wrapped in plastic wrap at room temp for up to 3 days. After that you can toast it or make a bread pudding! You could also keep it in the freezer for a month!