Showing posts with label yeast. Show all posts

Pittas {Radical Times}


There are many times in my life I told myself I couldn’t do something because I clearly didn’t have the skills to do it. And sometimes that is totally the case, I don’t have the skills to take apart a car engine and put it back together again. Now if I took the time and learned the skills to do just that, take apart and put back together a car engine then I could and I might. 

This is how I’ve felt, amongst other things, about making bread. I’ve been told how easy making bread is, but when I tried the first couple times it didn’t really turn out well. So, then I just assumed it’s something I’m not very good at. 

The more I have courage to attempt bread bakes the better I’m getting at them aka I’m gaining/learning the skills needed to make bread. So, when I stumbled across a recipe (more on that in the next post) that asked for pittas I thought to myself why not make them myself!? 


It was a radical idea at the time, trust me. 


It took a lot for me not to go out and buy some instead. I told myself no, I said to myself “You said you were going to make them so you’re going to make them!” Just so everyone knows it’s really okay to talk to yourself especially when encouraging yourself to do something you know you can do and you’re just trying to get away with taking the easy way out. 

I wasn’t going to make pittas on my own so I went to my trusted bread book titled: Simply Good: Bread by Peter Sidwell. Yup forget Mr. Hollywood Peter really knows what’s what. I also love his Simply Good: Pasta book, just so you know. 

It really couldn’t be easier. The first batch I put in the oven actually were better then the first as I rolled them out a bit thinner and the second batch were a bit thicker and didn’t balloon the same way. Those I just toast and cut up and dip in hummus! 


Pittas

500g strong white bread flour
1 1/4 teaspoon salt
300 ml water
1 tsp fast-action yeast
1 1/2 teaspoon sugar
2 tablespoon olive oil

In a big bowl stir the flour and salt together. Measure the water in a measuring jug and mix in the yeast, sugar, and olive oil. Make a well in the middle of the flour and pour in the liquid mixture. Using a spatula or wooden spoon start to bring the dough together, then use your hand until the dough comes away from the sides of the bowl. Lightly flour your work top and transfer dough from the bowl to the work top and knead for about 5-10 minutes. Mine took exactly 7, it should be smooth and springy. 
Leave to rise in a warm room for 30-40 minutes about 10 minutes before it’s due to be risen, heat the oven to 200C and line two baking sheets, I baked them in two batches, but you could bake them in one. 
Once the dough is doubled in size, knock it back by gently kneading it for several seconds, on a floured work top. Divide the dough into 12 portions as best you can. Carefully roll the portions in your hands to make an oval shape (like if you were making a snake with Play-Doh) then roll them out with a rolling pin until they are about the thickness of a pound coin or 1/2 cm. 
Place them on the prepared baking sheets and bake in the heated oven for 5-10 minutes. As I mentioned I made them in two batches so while the first 6 were in the oven I was rolling out the other 6. The should turn golden brown along the edges and balloon up; which gives you a pocket to fill with whatever you want!


This is how I filled mine... I'm writing all about it in my next post, so look out for it!

notes: recipe is adapted from Peter Sidwell’s Simply Good Bread as mentioned above. I have also linked it up with the Bready Steady Go challenge hosted by Utterly Scrummy Food and Jen's Food!


Bath Buns

It goes without saying that I was inspired to make these bath buns by my recent trip to Bath. I like playing the role of tourist ever once in a while. In some ways I still am a tourist. I am not a British citizen, but a guest who has paid quite a lot of money to stay as a permanent resident. Unless I leave for more then two years, then it’s void. So, one could say I am still a tourist. 


The other form of inspiration comes from Jane Austen's books Persuasion and Northanger Abbey; her heroines, in both titles, spend some time in Bath. It is also rumoured that Miss Austen enjoyed a good Bath Bun from time to time. 

While we were visiting Bath we did try Bath Buns from a tea room of he same name. They were good, but these were better. It’s not because I’m some great bun baker; I am still finding my way with bread and yeast risen bakes. I would say it’s because they were fresh … anything fresh out of the oven is usually better then something that came out of the oven that morning or perhaps even the day before. 


I’m really not trying to be rude about bakery’s because I love a good bakery, they are professionals and I’m just a home experimental baker. I just think home baked goods have a different feel/taste to them! 

The sugar cube in the middle of these sweet buns is what makes them a Bath Bun. There are several variations such as sugar covered caraway seeds, sultanas or raisins, or candied fruit peel. I however kept them simple and just used sugar! Sugar is good for you in moderation! 


Bath Buns

7g dried yeast 
250ml milk, tepid
450g strong white flour 
30g sugar
1 tsp salt
225g butter, softened 
12 demerara sugar cubes 
1 egg, beaten

Stir the yeast into the milk and set aside. Mix the flour, sugar, and salt and work in the butter until it resembles bread crumbs. You can use a stand mixer for this, as I did. Stir in the yeast/milk which should look a little bubbly by now, with a wooden spoon until completely mixed together. This is a wet dough, now leave to rest for 10 minutes.  

Since I used my mixer here is what I did: 
After letting the dough rest, using my dough hook I kneaded the wet dough for about 5-6 minutes, before tipping it out on to a floured work surface and finished kneading by hand for another 4-5 minutes until the dough was smooth and elastic. As it was a wet dough I liked using my mixer first as it kept it from being too sticky, but as I’m learning more about kneading I wanted to feel the dough, hence the stopping early. IF you are doing one or the other in the mixer do not knead for more then 8 minutes and if doing it by hand about start by stretching it out in the bowl before kneading it on a floured work surface for 10 minutes.

Place the smooth and elastic dough in a large bowl and leave for an hour to an hour and a half in a warm place until it’s doubled in size. 
Once it has risen, turn it gently out on to a clean work surface and knock it back by gently punching it. Divide the dough into 12 equal pieces as best you can. I start by dividing it in half and then each half into six. Roll the pieces into balls, by cupping the dough in your hand and gently rolling it on the work surface until it become ball shaped. 
With the dough ball seam side up press a sugar cube into the dough and fold the dough around it so it’s completely enclosed. If needed re-roll into balls and place on a prepared baking sheet seam side down. Repeat with all 12, cover with a clean damp towel and leave to rise in a warm place for 30 minutes or until doubled in size. 
Heat the oven to 190C. Once doubled in size brush the beaten egg over the buns and bake for 15-20 minutes until they are starting to turn golden and sound hallow when tapped. 

to finish:

Milk Glaze: 1 tbsp milk & 2 tbsp sugar
Sugar Topping: demerara sugar cubes, smashed 

Prepare the milk glaze when the buns are just about to come out of the oven, by gently heating the milk and sugar in a small saucepan until he sugar has dissolved. Once they are out of the oven cover the buns with the milk glaze before topping with crushed sugar cubes. 


notes: the recipe is adapted from Jamie’s Magazine Issue 27 Mar/Apr 12 it can also be found online here. My Bath experience was posted yesterday and can be read here. 

challenges: Bready Steady Go hosted by Jen’s Food along with Utterly Scrummy 


Huffkins {inspired by Paddington by Michael Bond} #storybookbakes

I don’t know how many times I have written about my love of books so I won’t go into too much detail all you need to know is that I love books. Okay? Okay, so I have been trying to figure out a way to combine my love of books and food for a while now on a regular basis and I think I have found a fuss free easy way to do it! 

Basically I am going to be baking and making from whatever novel or children's book or autobiography that inspires me to do so! See that wasn't so hard! Originally I was going to make it a linky post, but I started to find that a bit stressful. The stress of getting people involved etc... however I think I've come up with an easy solution for that too! See the notes below! 

I hope to do this at least once a month, possible 2 as I actually have a list of stuff I have been wanting to make inspired by my favorite books! This month I was inspired by Paddington and here's what I made! 


My girls and I went to see Paddington with some friends before Christmas and they loved it. It is very cute! After that my girls started asking for their Paddington book to be read at bedtime. Then they dug out their Paddington Cookery Book and insisted we make something from it.

They choose Huffkins! I tried to convince them to make something else, because I didn't want them to be disappointed. See bread and I have a love hate relationship. Meaning it either loves me or hates me and I never know which it will be!

However, love or luck or something was on my side the other night when we made these! They turned out just fine! The girls loved filling the indent with marmalade and munching on them before bed!


Huffkins

500g plain flour
50g butter
pinch of salt
2 tsp sugar
7g fast action yeast
120ml milk
120ml water
12 tsp marmalade

Start by sifting the flour and rubbing the cold butter into it, to make it look like breadcrumbs. Stir in the salt and sugar before adding the yeast, leave to the side while you heat the milk and water together until it’s just warm to the touch. Make a well in the center of your dry ingredients before pouring in the heated milk and water. Using a wooden spoon start to bring the dough together, once it’s started use your hand to finish making the dough into a big ball. On a clean counter surface knead the dough for a few minutes until the dough is smooth and completely combined. Place in a clean bowl and leave in a warm place to rise for an hour.
Heat the oven to 220C and lightly grease a baking tray. Divide the dough into 12 equal pieces the best you can, then gently roll them into balls and place on the prepared baking sheet. Press them down lightly to slightly flatten them, then using your thumb press a hole in the middle of each one (this was the girls favorite part.) Leave them for another 20 minutes to rise, or until they double in size. Once they are ready, bake in the preheated oven for 20 minutes. They should have a lightly tan/brown color to them, place a teaspoon of marmalade in each indent and enjoy while reading Paddington stories!


What is your favorite Paddington story? Leave a comment below! Mine will always have to be the original and first book about how the Browns came to have him living at their house!

notes: Recipe is adapted from Paddington's Cookery Book by Lesley Young. If you, like me, have been inspired by the books you read then I would love to see what you create whether it be food or a craft or art! Please get in touch in one or more of these ways: on Twitter tag me and use the hash tag and I will like and re-tweet! On Instagram tag me and hash tag and I will like it and leave a comment. If you have Facebook like my page (or not) but add your image to the page and I will share it with the rest of my readers! If you are on Google+ good luck to you! Just kidding I'm just not very good at being active on it. So, if you do share on there please be patient with me. If you prefer Pinterest, I will be starting a group board, if you would like to be added email me at unitedcakedom(@)gmail.com, unless you tell me otherwise I will use the email you emailed me with. 

Looking for inspiration? Here are a few of my old posts that were inspired by books I have read!

Monkey Bread

No one really knows where the name for this cinnamon sugar covered bread came from. It is possible it got its name because it resembles the fruit from a monkey-puzzle tree.

Once you've tasted it you won’t really care where the name came from only where you can you get some more!

It first appeared in women magazines in the USA back in the 1950’s. It has recently become popular because of the blogging world! It seems I have quite literally seen it everywhere in the last year or so.

Therefore it was no surprise when I saw a recipe appear in Ruby Tandoh’s book Crumb. I thought it was about time I tried it out for myself.

Monkey Bread reminds me a lot of a cinnamon roll, it’s the same components just differently executed. Chopped pecans or almonds could easily be layered between the dough balls before the second rise.

It’s super easy to make, like all yeast type bakes it’s more just the time. My kitchen is particularly cool so unless I move it into the lounge to rise sometimes it feels like it takes forever to rise properly.

But it’s well worth the time invested! It is a great way to get a sugar fix!


Monkey Bread

250ml full-fat milk
400g strong white flour
7g instant dry yeast
1 teaspoon salt
30g unsalted butter, softened

Gently heat the milk in a small saucepan until it’s warm to the touch. Stir the flour and yeast together, then stir in the salt. Pour in the warm milk and add the soft butter. Mix with a wooden spoon until it’s combined enough to use your hand to bring it together to form a soft dough. Very lightly dust the work surface and knead for 10 minutes. It should become elastic and have a smooth shine to it. Leave in a bowl to rise for at least an hour.

Glaze:
80g unsalted butter, melted
2 ½ tsp cinnamon
100g light brown sugar

Grease a bundt pan with some of the melted butter. If it’s not greased the bread won’t come out of the tin. Mix the cinnamon sugar with the brown sugar and leave aside in a bowl. Once the dough is raised, break into small balls the size of a walnut. Then dip in the melted butter and then the light brown sugar, before placing in a very well greased bundt pan. Don’t worry about how they are placed in the bundt pan. Once all the sugar coated dough balls are in the pan leave to rise for another hour or until doubled in size. Heat the oven to 180C and once it’s heated and the dough has risen bake for 30 minutes.
Once it’s done tip it out on to a plate immediately and only wait a few minutes until it’s cool to the touch to start ripping off pieces! 


notes: Adapted from Ruby Tandoh’s Crumb, which I reviewed here.

Chocolate Cherry Hot Cross Buns!


I thought it would be fun to try a new hot cross bun recipe this year! Seeing that chocolate and cherry are one of my favorite ‘chocolate &’ combinations ever, it didn't take long for me to decide to make these! I pick up magazines randomly never buying the same one every month, but one that I tend to buy most often is the Jamie magazine: I like the recipes, stories, and layout. I have always been a fan of Jamie Oliver, well I can't say always I should say since I moved to the UK. 

Anyhow… I am still a novice when it comes to bread/roll/bun baking. Think these took a while to rise for either or both of 2 reasons: 1. Cold kitchen it is always cold so moved next to pre-heating oven to get a better rise. 2. I didn't let the milk/butter mixture cool long enough before adding it to the dry ingredients which can kill the yeast. My bun rolling also needs serious work. I think I am worried about over kneading (also need to know if I’m kneading the “right” way) that I under knead. Oh and I probably could probably work on my piping skills too!

Overall these tasted delicious!! At the end of the day that is all that really matters!! Fresh out of the oven or put in the microwave for a several seconds with a light coat of butter! Like I already said I love the combination of chocolate & cherry so unless I messed them up completely or the recipe was off I was probably going to like them.


Apparently Sainsbury’s doesn't carry kirsch? I didn't feel like running around after one ingredient and Mr Knightley is allergic to orange juice so I used what was in kitchen: cherry juice (from cherry cola bundt cake) and Bacardi (love the stuff) to soak the cherries in. Enjoy!!

Chocolate Cherry Hot Cross Buns
from Jaime Magazine issue 37 March 2013

100g dried sour cherries
3 tbsp kirsch/orange juice or 2 tbsp cherry juice + 1 tbsp Barcardi
250ml milk
50g unsalted butter + extra for greasing
1 egg
2 tbsp cherry compote or jam
500g strong bread flour + extra for dusting
2 tsp ground cinnamon
2 heaped tbsp cocoa powder
2 x 7g sachets dry yeast
75g milk chocolate chips
75g caster sugar + extra for glaze
1 tsp fine sea salt
50g plain flour
3 tbsp runny honey

  1. Soak cherries in your chosen “juice” over night. The following day, place the milk and butter into a sauce pan and heat until the butter is just melted. Cool slightly before whisking in the egg and compote. Set aside.
  2. Drain the cherries and mix well in a bowl with flour, cinnamon, cocoa powder, yeast, chocolate chips, caster sugar, and salt. Make a well in the mixture and pour in the milk mixture, use a fork to stir it all together until it forms soft dough! Turn out on to a lightly dusted work surface and knead for 10 minutes until smooth and elastic. Place dough in a lightly buttered bowl and cover with cling film, keep it in a warm place for about an hour to rise or until it doubles in size. 
  3. Once it's raised, grease and line a baking tray or two, depends on your baking tray sizes. Knock back the dough, on a lightly dusted work surface, by kneading for about 2 minutes. Cut the dough in half and roll each half into sausages then cut each “sausage” into 6 pieces. Roll them into balls and place on baking sheets cover with cling film and let rise in a warm place for further 45 minutes. Mine took longer then that. Its really cold in the kitchen like I said above. 
  4. Once they have doubled in size preheat the oven to 190C/gas 5. Mix the plain flour and about 5tbsp of water until it makes a thick paste. Then pipe unto buns. Use a sandwich bag if you don’t have any piping bags and nozzles. I have them and I still used a sandwich bag. Pipe a cross on each one and then pop into the oven for 25-30 minutes or until golden. When the timer goes off check to see if they are golden-ish -hard to tell on a chocolate roll. Once they are out of the oven cool on a rack and make the glaze by gently heating the honey and 1tbsp sugar over a low heat for about 5 minutes. Generously cover each bun/roll with the sugar glaze. Cool before eating… or not!


notes: Jamie Magazine, last years buns

introducing My Mixtape! Usually when I'm baking I have music on so I thought I would start sharing my playlist. Since I grew up in the 80-90's and I used to record songs off the radio (music pirating at it's finest) to make mix tapes I thought that's what I would call this addition to my posts! Even though now I just download music off iTunes and I pay for it.....

Joss Stone: While You're Out Looking for Sugar
Bush: Glycerine
Bruno Mars: The Lazy Song
Foo Fighters: All My Life
Savage Garden: I Want You
   

The Perfect White Loaf & Rolls!!


With England being covered in white over the weekend I used it to my advantage and baked! 

As I said in my last post I am starting to be a lot more concerned about what's in my food and what I'm feeding my kids. So, I thought I'd give bread a go! I went straight to Nick Malgieri's Bake! 

Over Christmas I tried his Tiger Rolls and had good results. So, it was a no brain-er to go back to his book! 

So, first off I just want to say bread is pretty easy to make if you follow the "rules" and you have time for all the rising. Second I want to say if you are taking the time to make bread you might as well make double batches as bread freezes well! 


I only owned 1 loaf tin and never thought twice about it's size. The instructions from Nick say it should rise just above the rim. Mine didn't. It was then I thought  twice about the size of my tin. It's a 2lb loaf tin not a 1lb. Oops! As you see from the pictures it doesn't look perfect, but it still turned out nice! 


The other lesson I have learned from this is read through the whole recipe even the variations. When I started I was worrying about how I was going to bake 2 loaves with only 1 tin (which was the wrong size) and in the variations it says you can use half of a batch for rolls. So, that's what I did. We used them for ham & cheese sandwiches to go with homemade root vegetable soup! A perfect dinner for a cold night! 


I'm going to be trying other breads to find one that is easy and tasty enough to make on a regular basis. Therefore I'm not going to share the recipe with you on here at this time. Once I've found "the one" I will post the recipe! Does anyone have any suggestions for bread? Any tried and true recipes? 

notes: it looks like Bake! is only available from other sellers on Amazon. I wouldn't doubt the recipe I used for this loaf or something similar would be in his new book Bread! (it's on my wish list!) While I was getting supplies at my local store I picked up a couple of 1lb loaf tins! Now I'm better prepared! :0) 

Bramble and Chocolate Bread!!


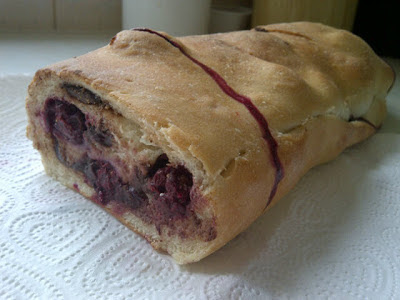
Winter is here! It makes me want to stay in a bake 24/7, if only I had the time! Skimming through my cookbooks looking for some good comfort food, I stumbled upon this recipe in Sue Lawrence’s A Cook’s Tour of Scotland.

It seemed interesting and having all the ingredients, except for the brambles (blackberries), it was decided! After a walk to the store I was all set! The house wasn't so warm so it took a little longer to rise then stated. The brambles burst in the oven and it oozed out of the top of the loaf. It was beautiful.


Bramble and Chocolate Bread

500g/1lb 2oz unbleached strong white flour, sifted
7g sachet of fast-action/easy-blend dried yeast
25g/1oz golden caster sugar
1 level tsp salt
2 tbsp sunflower oil
150g/5 ½ oz quality milk and/or dark chocolate, chopped
250g/9oz brambles (blackberries)

Mix together the flour, yeast, sugar, and salt; make a well in the center and slowly pour in the oil and enough tepid water (about 300ml/10fl oz/ ½ pint) to make a softish dough. (To have tepid water, mix two-thirds boiling water and one-third cold water.)
Using floured hands, bring the dough together and turn out on to a floured board then knead for 8-10 minutes, or until smooth. Keep the board lightly floured. The dough should be soft and shiny-looking but not too sticky. Place in an oiled bowl and cover with oiled clingfilm. Leave somewhere warm for 1-2 hours.
Lightly oil a baking sheet. Punch down the dough and roll out to a rectangle about 38 x 28cm/15 x 11 in. About the size of a baking sheet.
Scatter the chocolate and brambles over the long half then roll up along the long side to make a roly-poly about 38cm/15 in long.
Place this on the prepared baking sheet and cover loosely with oiled clingfilm then place somewhere warm. Leave to rise for about 45 minutes. Meanwhile, preheat the oven to 230C/450F/gas8. Remove the clingfilm, slash the top of the loaf five to six times and bake in the oven for about 20-25 minutes. Remove to a wire rack to cool until just warm before eating. Don’t want to burn yourself with hot melted chocolate!


Cinnamon Pull-Apart Bread!!


Dough

  • 2 3/4 cup plus 2 Tbsp all-purpose flour
  • 1/4 cup sugar
  • 2 1/4 tsp. active dry yeast (1 packet)
  • 1/2 tsp. salt
  • 4 Tbsp. butter
  • 1/3 cup whole milk
  • 1/4 cup water
  • 2 eggs (at room temperature)
  • 1 tsp. pure vanilla extract

Filling

  • 1 cup sugar
  • 2 tsp. cinnamon
  • 1/4 tsp. nutmeg
  • 4 Tbsp. butter, melted
    1. In a large mixing bowl, mix 2 cups of flour, sugar, yeast and salt. Set aside.
    2. In a small sauce pan, melt the butter and milk. Once the butter is completely melted take off the burner and add the water and vanilla. Let the mixture cool for 5 minutes.
    3. Pour the milk mixture into the large bowl with the dry ingredients and mix well. Whisk together the eggs and add to the batter. Keep mixing. Add 3/4 cup of flour and mix well. The mixture will be very sticky which means it's perfect. Place the dough in a medium greased bowl. Cover with wrap and let it sit in a warm place to rise for about 30-45 minutes. Once the dough has doubled its size, knead in 2 tablespoons of flour. Cover the dough again for 5-10 minutes.
    4. Meanwhile, start on the filling. In a medium bowl, mix together the sugar, cinnamon and nutmeg in a small bowl. Set aside.
    5. Once the dough is ready, roll it out on a floured surface. Brush the melted butter on the dough and add the sugar mixture. Make sure everything is covered. Using a shape knife or pizza cutter, cut the dough into equal sized strips (about 2 to 2 1/2 inches wide). Then cut the strips into equal sized squares. Stack the squares on top of each other to make 3 to 4 piles and place them in a bread pan. Take any sugar that fell off squares and sprinkle over the top and around the sides of dough. Cover the dough for another 10-15 minutes to rise.
    6. While dough is rising, preheat your oven to 350 degrees F. Place a cookie sheet under bread pan and bake for 30-35 minutes until outside of bread is golden brown.
This recipe I found on Food Snots! These were super yummy and a lot easier then cinnamon rolls, but with the same cinnamon-y taste! I added a glaze here's how I made my glaze:  
  • 1 cup powdered sugar
  • 1 tsp vanilla bean paste
  • 2 tbsp milk
  1. Mix together to desired constancy
  2. I put it in as it was cooling. 
Sooooo Yummy!!! Another easy breakfast treat or for whenever! ~Janet

Ooey Gooey Cinnamon Rolls!!


2 (1/4 ounce) packages active dry yeast
1 cup warm water
2/3 cup sugar
1 teaspoon sugar
2/3 cup butter
2 teaspoons salt
2 eggs, slightly beaten
7 cups flour
1 cup warm milk

Filling

1 cup melted butter
1 3/4 cups sugar
3 tablespoons ground cinnamon
1 1/2 cups chopped walnuts (optional)
1 1/2 cups raisins (optional)
Topping
1 cup butter or 1 cup margarine
1/2 cup brown sugar
1/2 cup Karo syrup
2 cups pecans, chopped (optional)

In a cup, combine yeast, warm water and 1 tsp sugar. Stir and set aside.
In a large bowl, mix milk, remaining sugar, butter, salt and eggs. Stir well.
Add yeast mixture.
Add half the flour and beat until smooth.
Stir in enough of the remaining flour until dough is stiff.
Turn out onto a well-floured board.
Knead for 10 minutes.
Place in a plastic bowl and cover.
Let dough rise in a warm place until double in bulk. This may take 1 1/2 hours.
Punch down dough and let it rest for 5 minutes.
Roll out on a floured surface into a 15x20 inch rectangle.

 To prepare filling----------.
Spread dough with half cup butter.
Mix together 1 1/2 cups sugar and cinnamon and sprinkle over buttered dough.
Sprinkle with walnuts and raisins.
Roll up and pinch edge together to seal.
Cut into 12 slices.
Coat bottom of a 13 by 9 inch baking pan and an 8 inch square pan with remaining 1/2 cup melted butter.
Sprinkle with remaining 1/4 cup sugar.
Place cinnamon roll slices close together in pans.
Let rise in a warm place until dough is doubled in bulk i.e. for about 45 minutes.

Topping----------.
In a saucepan, place all ingredients except for pecans.
Melt these ingredients on range top.
Mix in pecans and then pour over the top of rolls.
Preheat oven to 350°F.
Bake for 25 minutes or until done.
Cool.


This recipe come from food.com Recipe #9533 by Charishm Ramchandani

Sticky Sticky Buns!!

I have wanted to make these forever and I don’t know why I've waited so long! 

These are gooey, sticky, and extremely sugary! 

Check out my previous post, Joanne Chang’s book Flour, or this website to get the recipe for the basic brioche dough that you need to make these. 

What follows are the ingredients and instructions to create these Sticky Sticky Buns! 

Thank you Joanne for sharing these with the world! Enjoy!!

Sticky Sticky Buns:

Goo:

  • 3/4 cup (1 1/2 sticks; 170 grams, 6 ounces) unsalted butter
  • 1 1/2 cups (345 grams) firmly packed light brown sugar
  • 1/3 cup (110 grams) honey
  • 1/3 cup (80 grams) heavy cream
  • 1/3 cup (80 grams) water
  • 1/4 teaspoon kosher salt
  • Basic Brioche Dough, recipe in previous post
  • 1/4 cup (55 grams) light brown sugar
  • 1/4 cup (50 grams) granulated sugar
  • 1/8 teaspoon ground cinnamon
  • 1 cup (100 grams) pecan halves, toasted and chopped

Directions:

First, make the goo. In a medium saucepan, melt the butter over medium heat. Whisk in the brown sugar and cook, stirring, to combine (it may look separated, that's ok). Remove from the heat and whisk in the honey, cream, water, and salt. Strain to remove any undissolved lumps of brown sugar. Let cool for about 30 minutes, or until cooled to room temperature. You should have about 3 cups. (The mixture can be made up to 2 weeks in advance and stored in an airtight container in the refrigerator.)
Divide the dough in half. Use half for this recipe and reserve the other half for another use.
On a floured work surface, roll out the brioche into rectangle about 12 by 16 inches and 1/4-inch thick. It will have the consistency of cold, damp Play-Doh and should be fairly easy to roll. Position the rectangle so a short side is facing you.
Goo, filling, ready for rolling, all rolled up

In a small bowl, stir together the brown sugar, granulated sugar, cinnamon, and half of the pecans. Sprinkle this mixture evenly over the entire surface of the dough. Starting from the short side farthest from you and working your way down, roll up the rectangle like a jelly roll. Try to roll tightly, so you have a nice round spiral. Trim off about 1/4- inch from each end of the roll to make them even.

Use a bench scraper or a chef's knife to cut the roll into 8 equal pieces, each about 1 1/2-inches wide. (At this point, the unbaked buns can be tightly wrapped in plastic wrap and frozen for up to 1 week. When ready to bake, thaw them, still wrapped, in the refrigerator overnight or at room temperature for 2 to 3 hours, then proceed as directed.)

cut and set in goo

Pour the goo into a 9 by 13-inch baking dish, covering the bottom evenly. Sprinkle the remaining pecans evenly over the surface. Arrange the buns, evenly spaced, in the baking dish. Cover with plastic wrap and put in a warm spot to proof until the dough is puffy, pillowy, and soft and the buns are touching-almost tripled in size, about 2 hours.
Position a rack in the center of the oven, and heat to 350 degrees F.

Bake until golden brown, about 35 to 45 minutes. Let cool in the dish on a wire rack for 20 to 30 minutes. One at a time, invert the buns onto a serving platter, and spoon any extra goo and pecans from the bottom of the dish over the top.


The buns are best served warm or within 4 hours of baking. They can be stored in an airtight container at room temperature for up to 1 day, and then warmed in a 325 degree F oven for 10 to 12 minutes before serving. 

Yummy Yummy Sticky Sticky Buns!!